Friday 28 March 2008

Paint!


I had a bit of time to work on the chassis, which has only surface rust, so I dropped out the petrol tank and some of the fuel lines from the rear. I also took out the rear section of the floor to get better access to the chassis. I only got about half of the job done. The metal was ground back to a nice shine and then painted in yellow. This might seem a bit gaudy but two things should be remembered:
1: this is the chassis, so it won't be seen.
2: this way, if the paint gets stone-chipped I will see a big black spot in the middle of the yellow, which makes rust inspection easy.
While I was at it, I also gave two body panels a quick spray to see what my plan would look like. I have to say I do like it!

Saturday 16 February 2008

"get the heat at it"


I haven't done much with the range rover lately, I simply haven't had the time. Last time I was working on her I had another go at loosening the crank-crank pulley bolt, no luck however. The starter assembly is also well-held and with it's incredibly annoying hex-head allen bolts now rounded I may get the drill out to get it off. My solution for the Crank bolt is, as a friend and fellow v8 nut said, to "get the heat at it", so it'll be gas and flame for this one. When i finally get that bolt out I won't be wasting time faffing about trying to do the impossible.
I will be able to:
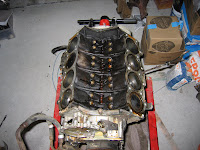
-Remove the timing cover (front cover) from the engine.
-Remove the timing chain and sprockets from the cam and crank.
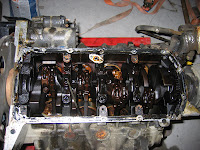
-Remove the cam.
-Remove the crank, pistons and bearings.
-Give the block a good clean (possibly a professional chem. clean)
-Strip the block of it's old liners.
-Have new ones pressed in.
-Have the head and block faces checked and skimmed as necessary.
-Start my part of the rebuild!!!!!

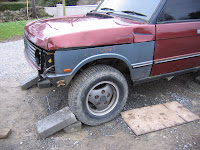
I've been doing a bit of rust repair here and there on the body and chassis, though there's nothing much more than surface rot (miracle!).
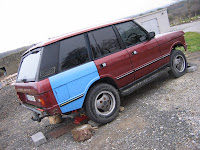
I have also now decided that the body will get sprayed by yours truly using plastikote cans and I have done a test panel, not in the end colour, but just to see what kind of finish i would get. Even in very damp evening conditions the finish was pretty excellent. I'm torn between colours at the minute, but I'm thinking of a possible G4 land-rover look or Arctic Cammo. I'm not exactly after the "all-black" look. :-)

I also fit the "new" wing (courtesy of Rick!). Someone wrote I <3 V8s on it... hmmm.

Friday 18 January 2008

Not one-track!


Everything lately has been about the engine. I have still been attending the vehicle itself. Of late i removed all the interior carpets, the grab handles and the sun visors (because the interior was getting a bit smelly). Now it's mostly bare metal. I removed the sagging headlining, which showered me in spiders and flies. I fixed the rear right wheel, which sat very very flat until now. I also noticed that the 245s on the range rover, while they look ok/small on the car, absolutely dwarf even some large tyres on an r14! I must admit to going back to the engine a few times. I tapped out the core plugs, this is easy, just tap one side of the plug with a hammer and bolt, and when the other side rises, pull it out with a pliers. It's out with the old and in with the new, but not right away. I need to clean the engine "core" ie, the channels through which the coolant runs, which are filthy with residue.

Little by little:

I'm being held back by a few problems now. The bolt which retains the crank pulley to the crankshaft is quite seized, I can't decide what to do about it. I restrained the crankshaft and pulley assembly and it DID NOT move, but neither did the bolt. I stopped out of fear of damaging the engine-bellhousing junction where the engine stand is connected. Also the starter bolts (which have an allen key head) are held in tight and i can't remove one of them. The assembly is held by two bolts, one of which came off with some effort, but the other one is just "spiralled", the allen equivalent of "rounding". The allen wrench just slides out under turning. The head of the bolt is too smooth and round to grip with a pliers or vise grip. It might even take the hacksaw to solve this but I haven't given up yet.

Tuesday 8 January 2008

Again the waiting game:

I've got the heads off and the sump now and i've to make a bracket to take the crank pulley off before i go any further. So that's one job I'll be getting on with during my next mad bout of working on her. However i now need to slow my pace as my plans have changed somewhat, and i can't afford all that i want to do.

The plan (all going well):
-Rebuild it, everything will be replaced but the block, timing cover and sump
-I have plans for stage 3 heads
-An upgraded camshaft
-As close to TVR spec as possible
-Some upgrades in terms of off-road ability.

Where does it all come from????

First off i need to amend my last post and say that the "biting" around the valley of the engine is "probably just rough casting" as i've been told by v8 people, and shown in photos of new (yes NEW) v8s.

So Liam, it's not your fault or the previous owners fault!

Which is great, absolutely great...

...but


where the hell did the three tones of scrap metal in the sump come from??

There is at least two cups full of swarf and chipped metal, it's honestly piston-sized quantities, and if the metal didn't come from the "biting", so Where DID it come from? With the bottom end exposed now I can see almost everything is in good shape. The only one real problem is the 50 kilos of burnt oil (caused by her overheating problems!) and that's only a problem because I smell of 4x4 every time i take the bus. Yes, I said bus, I'm saving up for parts!


That's all for now.

Friday 21 December 2007

The engine (so far):


So far, with the engine out, i've removed the plenum chamber, intake manifold, valley gasket, water pump, rocker covers and the rocker shafts.
The inside of the engine is fairly sickly in appearance, the oil sitting around the rocker shafts was burned black and full of tiny "lumps", shards of metal - bad news! on further inspection there were tiny "bites" out of the metal of the block just above the camshaft in the same region as the tappets. This is somewhat of a mystery to me as the camshaft (from in-situ inspection) seems perfectly healthy and all of the tappets are also reasonably good, all have a rounded wear pattern on the camshaft contact surface - a sign of rotary wear (a good thing).


The damage to the block (while not visible itself) is in the region of the bottom of the valley between the left and right rows of tappets (can be seen in the last photo - if the block valley were really a valley, the problem would be the erosion of the riverbanks, only the banks are made of cast aluminium... oh dear!)